
Step 4: Head tracker and Magic Box
Magic Box takes your HOTAS over USB and the head tracker over PPM, and builds one RC signal from them. It doesn’t transmit by itself: the FRM303 module does that, and the receiver in the helicopter binds to the module.
Before you start
Section titled “Before you start”Open the Web UI. Magic Box needs firmware v2 and runs its own Wi-Fi. Switch it on (v2.0 hardware has a power switch), join the MagicBox-XXXX network and open http://magic.box. Updating the firmware wipes the configuration, so back up first.
Power on the ground. Use a 3S to 6S LiPo on the Magic Box XT60, because USB can’t carry a whole HOTAS. The 4S LiPo from the helicopter kit is fine for this. Feed the TX module from the same pack with a Y-cable into its XT30, with the FRM303 power switch on Ext. Don’t tap power inside Magic Box.
Head tracker
Section titled “Head tracker”Our SyncPilot sits on the goggles and sends PPM through a cable into Magic Box. It sends yaw as its own channel 5 and pitch as its own channel 6. Those are positions inside the tracker’s PPM signal, not the Magic Box channels in the table below.
Charge the module and switch it on: press M once, release, then hold for 2 seconds. Connect its PPM output to a PPM jack on Magic Box, then:
- Add a Wired module with two inputs:
ht panwith source channel 5 andht tiltwith source channel 6. The External Inputs walkthrough uses 1 and 2 as its example. - Open the module and move your head. The live preview should follow. If it doesn’t, see Nothing arriving?
- Bind Magic Box channel 10 to
ht panand Magic Box channel 11 toht tilt. - Install CwHeadTracker from the SyncPilot product page on a Windows PC and connect the module by USB. Check the gain first: one of ours came set to 8.0, which makes the camera twitchy. A gain of 2.0 means 30° of head movement gives 60° of camera. After a change: Upload Param, then Save Flash.
- Hold M to recentre. A single press before the hold switches the tracker off instead.
Channel plan
Section titled “Channel plan”Create a new profile and set each channel as in this table. New to Magic Box? Do Quick Setup first. Don’t reverse anything in the flight controller: reversing is done in Magic Box, on the channels marked below. Mode 2, channel order AETR.
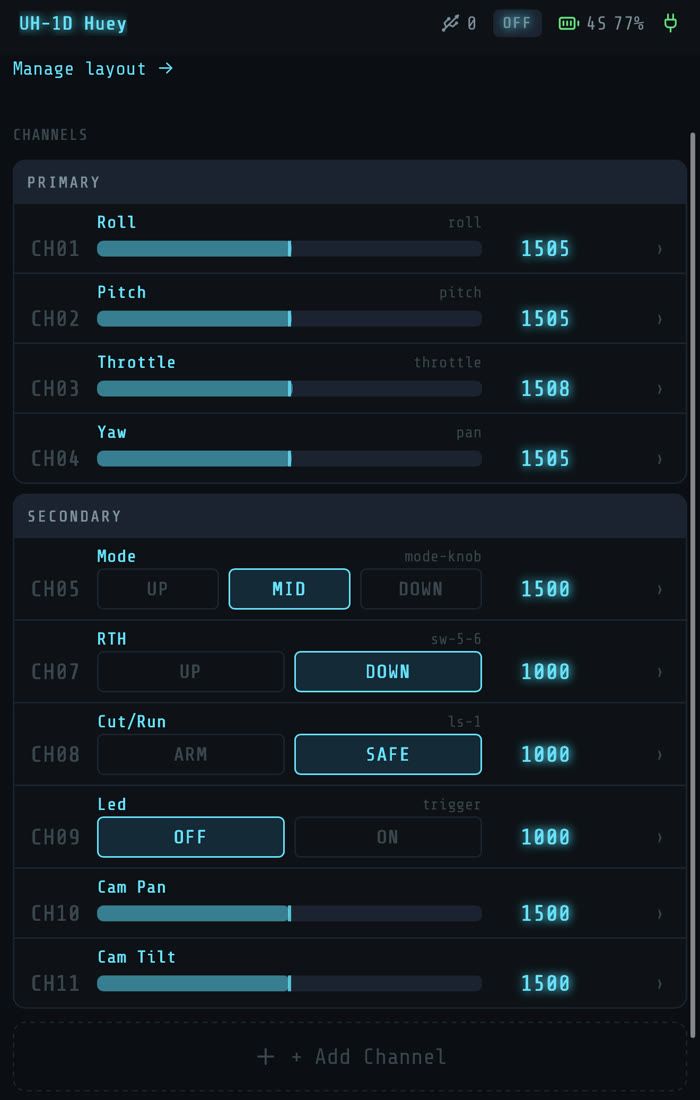
| Ch | Function | What we bound it to | Values at the flight controller |
|---|---|---|---|
| 1 | Roll | WinWing stick, left and right | Weight 50, so 1250 to 1750 |
| 2 | Pitch | WinWing stick, forward and back | Reversed, weight 50 |
| 3 | Throttle / collective | X56 throttle lever | 1000 to 2000. Never below 975, the throttle-failsafe threshold |
| 4 | Yaw | WinWing pedals | Left 1000, right 2000 |
| 5 | Flight mode | X56 mode knob, 3 positions | 1000 Manual (Acro), 1500 Angle (Stabilize), 2000 GPS (Loiter) |
| 6 | Accessory | Nothing | Free in our profile |
| 7 | Return to home | X56 toggle SW5/6 | Rest 1000, RTL 2000 |
| 8 | Motor interlock | Arm Switch from X56 toggles SW1/2 and SW3/4 | Rest CUT 1000, RUN 2000 |
| 9 | LED patterns | Stick trigger | Rest 1000 |
| 10 | Cam Pan | Head tracker + Override | Gimbal yaw |
| 11 | Cam Tilt | Head tracker + Override, Reversed | Gimbal pitch |
| 14 | Leave free | Nothing | The FRM303 puts signal strength here |
- Fine-tuning, optional: S.BUS reads about 5 µs low, which is harmless. We add Center Offset 5 on channels 1 to 4 (the channel’s Trims section) and an upper limit of 2005 on channel 3, so centre reads exactly 1500.
- Channel 8 stays binary. A value mid-range counts as RUN, and the flight controller won’t arm.
- Right after power-on, channels 7, 8 and 9 must read 1000.
- Arm Switch for channel 8: under Devices open the X56 throttle, choose Add Element, then Arm Switch, pick the two toggles and bind channel 8 to it.
- This guide uses the plain mode names. ArduPilot shows the names in brackets.
- Your HOTAS can differ from ours. The table is what has to come out at the flight controller, whichever control you bind.
Choose the critical controls on purpose
Section titled “Choose the critical controls on purpose”You fly this with goggles on, so you find every control by touch. Three functions shouldn’t land on whichever switch happens to be free.
| Function | What to look for | What we use |
|---|---|---|
| Motor interlock (Cut/Run) | Use two switches, always. Cutting the motor a moment late in an emergency is better than cutting it by accident in flight. The channel must only ever output 1000 or 2000: a mid-range value counts as RUN and blocks arming. | An Arm Switch: both toggles up is RUN, both down is CUT, and one toggle alone changes nothing. A bump can’t start or stop the rotor. CUT takes two movements on purpose, so practise it with the goggles on. |
| Return to home | Its own toggle, away from the controls you use all the time. Bottom position is off. | X56 toggle SW5/6. |
| Head tracker cut-off (Override) | A switch you can hit blind, on the hand that stays on the throttle. If the tracker misbehaves you need the camera back at once. | X56 slide switch SLD hands the camera from your head to rotary knobs RTY3 and RTY4. It also gives you manual centring. |
| Flight mode | A 3-position control with clear stops, so you can feel which mode you’re in. If yours reports as two buttons, set it up as a 3-position switch with the middle as neither pressed, then check you get 1000, 1500 and 2000. | X56 mode knob. |
The flight controller’s arming stays on the stick gesture, so it needs no switch at all (step 7).
Radio link
Section titled “Radio link”- The FRM303 isn’t plug-and-play. Follow the four steps of FRM303 PPM setup: cable, Magic Box setting, module input, LED check.
- To set the module’s input, hold Up while powering on, 3 to 9 seconds, and select PPM. Past 9 seconds it enters forced update. The LED going from red to slow blue means it sees PPM.
- FRM303 model slot, RF system Routine 18CH two-way, receiver output S.BUS. Button sequences are on FRM303 slots & binding.
- Unplug the kit’s receiver and plug the INr6-HS into the RX socket on the flight controller, using its NPA port (CH6), which carries S.BUS. We get all 16 channels there.
Flying with a regular radio
Section titled “Flying with a regular radio”The helicopter doesn’t care what makes the signal. We haven’t flown this route, but a radio has to do three things:
- Take the head tracker through its trainer port or a Bluetooth input.
- Put pan and tilt on two channels the helicopter doesn’t use.
- Deliver them all the way to the flight controller. We use 10 and 11. With other channels, set
SERVOn_FUNCTIONto 50 plus the channel number.
Copy channels 1 to 9 from the table above, including the reversals.
The Flysky FS-i6S that comes with the helicopter isn’t a good candidate: its manual documents trainer input only on channels 1 to 4, which are your flight controls.
Check every channel at the flight controller, not on the transmitter. That’s in step 5.