External Inputs (PPM + Bluetooth)
Magic Box can take channel data in as well as send it out. Anything that speaks PPM — a wired head tracker, a second radio in trainer/student mode, a sim-style PPM joystick — plugs into the PPM jack (same 3.5 mm jack used for PPM output, electrically bidirectional) and shows up as extra inputs you can route to any channel.
In v2 the building block is the Input Module:
- A Module describes the external source (its name, type, and how many channel slots it carries).
- A Channel can bind to a Module input the same way it binds to a HOTAS axis on a USB device.
That’s the whole abstraction. The walkthrough below uses a head tracker as the example — same flow works for a second radio in trainer mode or any other PPM source.
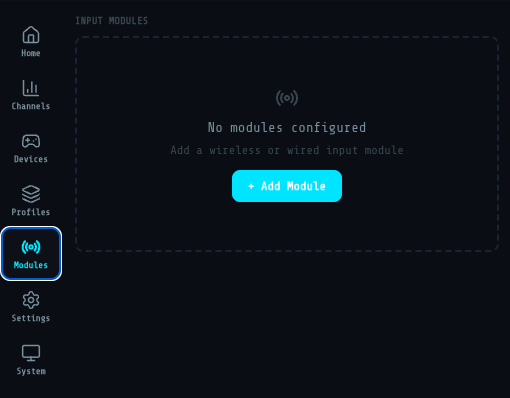
1. Open the Modules screen
Section titled “1. Open the Modules screen”In the Web UI sidebar pick Modules. On a fresh setup you’ll see an empty list with + Add Module.
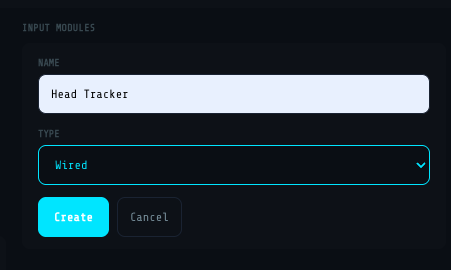
2. Create a Wired module
Section titled “2. Create a Wired module”Click + Add Module, name it (e.g. Head Tracker), pick Wired as the type.
3. Add inputs (one per PPM channel slot you want)
Section titled “3. Add inputs (one per PPM channel slot you want)”Open the module and + Add Input for each PPM slot you want to use. The slot number on the wire (Input 1 = first PPM channel, Input 2 = second, etc.) is independent of the Magic Box channel it eventually drives.
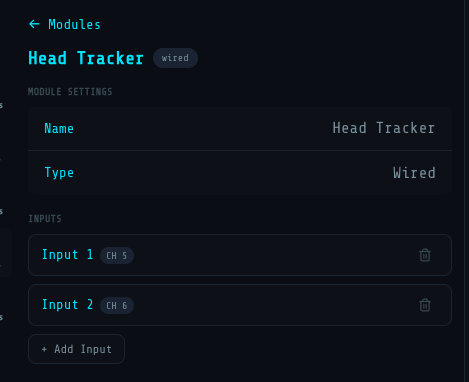
A typical head tracker sends two axes (pan + tilt) on Inputs 1 and 2.
4. Bind a channel to a module input
Section titled “4. Bind a channel to a module input”Switch to Channels, open the channel you want to drive from the external source, expand Binding, pick Module, then choose your module and the specific input.
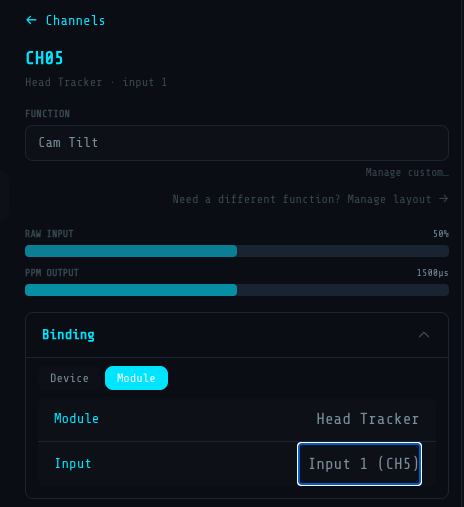
That channel now follows the external PPM source. Repeat for every channel you want from that module (e.g. CH5 ← Head Tracker / Input 1 for Cam Pan, CH6 ← Head Tracker / Input 2 for Cam Tilt).
Verify before you fly
Section titled “Verify before you fly”Channels with Module bindings show RAW INPUT filling live as the external source moves — exactly the same live bar you see for USB-device bindings. Move the head tracker (or wiggle the trainer stick) and watch the bar travel; then watch PPM OUTPUT on the channel match the source.
Other PPM sources, same recipe
Section titled “Other PPM sources, same recipe”- Second radio in trainer / student mode — your trainer-port output IS a PPM stream. Create a Wired module, add as many inputs as your radio sends (typically 4-8), bind the channels you want to override.
- Stand-alone PPM joystick / encoder — same thing. If it speaks PPM on a 3.5 mm jack, Magic Box treats it as a Wired module.
Bluetooth head tracker — same recipe, wireless
Section titled “Bluetooth head tracker — same recipe, wireless”Modules also cover Bluetooth head trackers — no cable, just a paired MAC address. Today Magic Box supports one wireless device: Head Tracker v2.2 (open-source DIY head tracker, BLE-pairable). The flow mirrors the PPM walkthrough above — only the module type and the pairing detail change.
1. Find the Bluetooth MAC on your head tracker
Section titled “1. Find the Bluetooth MAC on your head tracker”Connect the head tracker to your computer over USB and open the vendor’s configuration app. The Bluetooth tab shows the device MAC in the format AA:BB:CC:DD:EE:FF — copy it. You’ll paste it into Magic Box in the next step.
While you’re in the head tracker config app, also confirm which channels the tracker sends on the BLE side (pan / tilt / roll — typical defaults are channels 5 and 6). See tilt-roll-pan settings on the vendor docs.
2. Create a Wireless module
Section titled “2. Create a Wireless module”In the Magic Box Web UI go to Modules → + Add Module. Name it (e.g. Head Tracker), pick Wireless as the type, paste the MAC, click Create. The module shows up in the list with the BLE badge and the MAC printed under the name.
3. Add inputs (one per axis the tracker sends)
Section titled “3. Add inputs (one per axis the tracker sends)”Open the new module and + Add Input for each axis the head tracker is configured to transmit. A typical setup exposes Pan and Tilt on two BLE channels — match the source channel number you set in the head tracker’s config app (e.g. Input 1 → CH 5 for Pan, Input 2 → CH 6 for Tilt).
4. Bind a Magic Box channel to a Wireless module input
Section titled “4. Bind a Magic Box channel to a Wireless module input”Same as the PPM flow above. Switch to Channels, open the channel you want the head tracker to drive, expand Binding, pick Module, then choose Head Tracker and the input. Activate the profile — Magic Box pairs with the head tracker over BLE on profile load and starts streaming.
- Magic Box pairs with one Bluetooth device per profile. To switch trackers, edit the MAC on the module (or create a separate profile with a different module).
- Battery and BLE link state live on the head tracker itself — Magic Box only consumes the stream. If pairing fails on profile activation, double-check the MAC and that the tracker is powered on and not paired with another host (phone, PC).
- If you want a kill-switch to mute the head tracker mid-flight without unbinding, use a Channel Override (in the channel editor) — same pattern as the PPM
sldswitch on the v1 firmware.
- Want to send signals out of Magic Box instead? See Output Signals.
- Trainer-port wiring tip: it’s the same 3.5 mm jack as PPM output and the two jack contacts (Tip, Ring) are shared between input and output. Pick the output contact in Settings → Output → PPM Pin — Magic Box automatically reads the opposite contact as the PPM input. Flip Tip ↔ Ring in Settings and the input swaps with it; the two cannot share one contact since a single GPIO can’t be both OUT and IN at the same time. Full output-side wiring detail in PPM (analog).